django对接支付宝的采坑之旅 一、背景 自己使用Django开发的电子商城项目中订单提交支付需要对支付宝进行付款,在开发中使用alipay的接口时出现了一些问题,不过最后降低版本后,成功实现了沙箱模拟支付宝接口[[1]][1]的调用。做此笔记,记录学习过程中遇到的问题,防止以后出现同样的问题浪费时间。
二、使用支付宝接口的过程 我所开发的环境:Python3.6+Django2.2
1.安装依赖包 pip install python-alipay-sdk==1.10.1
这里我选择了安装1.10.1版本的alipay包,因为一开始安装了最新版的,在创建alipay对象的时候出现了startwith无法对bytes类型的密钥进行判断加载,感到很奇怪,因为startwith函数在我python3.6的版本一下是针对的只有str类型。尝试了很多次后,经提点,降低了alipay的版本。因为不同版本改动还是比较大的,这才使得异常消失。
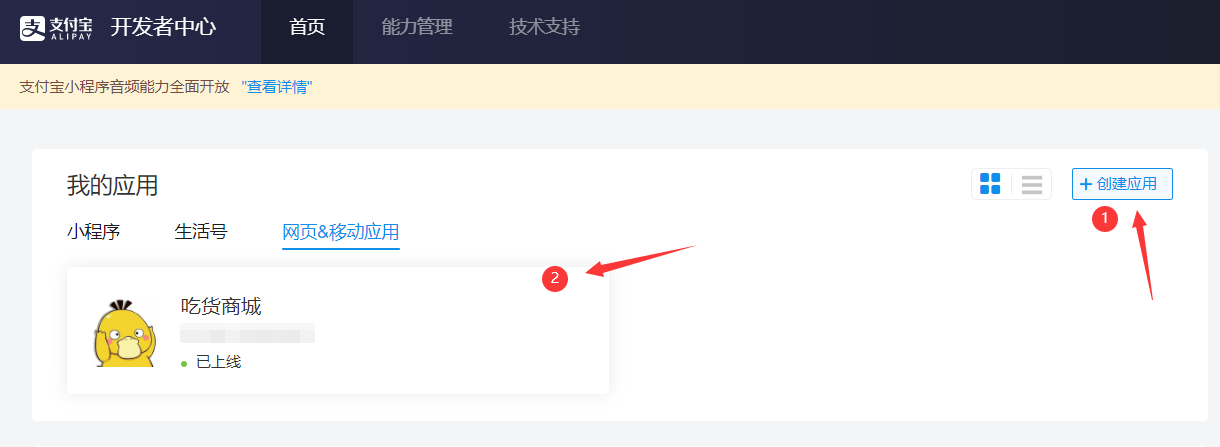
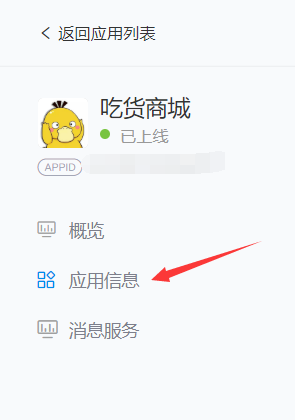
2.注册成为支付宝开发者 首先添加应用
添加应用成功后,获取到的appid,这个需要保存到项目中(稍后会提到),然后进行密钥的配置
3.获取应用公私密钥以及支付宝公钥 获取密钥的方式,有两种,一种是利用openssl获取密钥,另一种使用支付宝提供的密钥生成工具获取密钥。
我使用的是用支付宝开发平台助手进行密钥的生成。
按照上述选择后生成密钥,可以将密钥赋值下来,稍后添加到项目中使用,以及用应用公钥来获取支付宝密钥。
去开发者界面设置接口加签方式,点击设置。
进去后,输入应用公钥,然后获取支付宝公钥。
这里简单说一下:因为我对加密算法不是很了解,就我知道的介绍一下:
(1)公钥和私钥可以适用于非对称加密算法。公钥顾名思义,是公开的,因此公钥尝尝用来进行加密,而私钥是隐私的,只有本人知道,因此用于对公钥加密后的信息进行解密,这样就只有我拿到了我的信息,别人是拿不到的。
(2)数字签名,是由交易信息+私钥信息计算得出的,因为数字签名隐含私钥信息,所以可以证明自己的身份。
4.Django使用alipay 1 2 3 4 5 6 7 8 9 10 11 12 13 14 15 16 17 18 19 20 21 22 23 24 25 26 27 28 open (settings.APP_KEY_PRIVATE_PATH).read()open (settings.ALIPAY_PUBLIC_KEY_PATH).read()@property def get_alipay (self ):"RSA2" , return alipay @staticmethod def combine_str (alipay, order ):"""assemble the url of get""" str (order.total_price), return order_string
以上两个方法分别是生成alipay对象,和组装url,向支付宝发送GET请求,跳转到支付界面。
注:
alipay2.0+ 和我当前1.10.1的版本关于Alipay的区别还是有一些的,下面是1.10.1的Alipay的部分源码。
1 2 3 4 5 6 7 8 9 10 11 12 13 14 15 16 17 18 19 20 21 22 23 24 25 26 27 28 29 30 31 32 33 34 35 36 37 38 39 40 41 42 43 44 45 46 47 48 49 50 51 52 53 54 55 56 57 def __init__ ( self, appid, app_notify_url, app_private_key_path=None , app_private_key_string=None , alipay_public_key_path=None , alipay_public_key_string=None , sign_type="RSA2" , debug=False """ 初始化: alipay = AliPay( appid="", app_notify_url="http://example.com", app_private_key_path="", alipay_public_key_path="", sign_type="RSA2" ) """ str (appid) None None if sign_type not in ("RSA" , "RSA2" ):raise AliPayException(None , "Unsupported sign type {}" .format (sign_type))if debug is True :"https://openapi.alipaydev.com/gateway.do" else :"https://openapi.alipay.com/gateway.do" def _load_key (self ):if not content:with open (self._app_private_key_path) as fp: if not content:with open (self._alipay_public_key_path) as fp:
说明:
生成实例化主要过程是读取配置文件,然后进行RSA加密算法,获取加密后的密钥。
一开始我错的原因在于RSA包中的加密算法。如下是RSA加密密钥的算法的加密部分源码:
1 2 3 4 5 6 7 8 9 10 11 12 13 14 15 16 17 18 19 20 21 22 23 24 25 26 27 28 29 30 31 32 33 34 35 36 37 38 39 40 41 42 43 44 45 46 47 48 49 50 51 52 53 54 55 56 57 58 59 60 61 62 63 64 65 66 67 68 69 70 71 72 73 74 75 76 def import_key (extern_key, passphrase=None ):"""Import an RSA key (public or private half), encoded in standard form. Args: extern_key (string or byte string): The RSA key to import. The following formats are supported for an RSA **public key**: - X.509 certificate (binary or PEM format) - X.509 ``subjectPublicKeyInfo`` DER SEQUENCE (binary or PEM encoding) - `PKCS#1`_ ``RSAPublicKey`` DER SEQUENCE (binary or PEM encoding) - OpenSSH (textual public key only) The following formats are supported for an RSA **private key**: - PKCS#1 ``RSAPrivateKey`` DER SEQUENCE (binary or PEM encoding) - `PKCS#8`_ ``PrivateKeyInfo`` or ``EncryptedPrivateKeyInfo`` DER SEQUENCE (binary or PEM encoding) - OpenSSH (textual public key only) For details about the PEM encoding, see `RFC1421`_/`RFC1423`_. The private key may be encrypted by means of a certain pass phrase either at the PEM level or at the PKCS#8 level. passphrase (string): In case of an encrypted private key, this is the pass phrase from which the decryption key is derived. Returns: An RSA key object (:class:`RsaKey`). Raises: ValueError/IndexError/TypeError: When the given key cannot be parsed (possibly because the pass phrase is wrong). .. _RFC1421: http://www.ietf.org/rfc/rfc1421.txt .. _RFC1423: http://www.ietf.org/rfc/rfc1423.txt .. _`PKCS#1`: http://www.ietf.org/rfc/rfc3447.txt .. _`PKCS#8`: http://www.ietf.org/rfc/rfc5208.txt """ if passphrase is not None :if extern_key.startswith(b'-----' ):if enc_flag:None return _import_keyDER(der, passphrase)if extern_key.startswith(b'ssh-rsa ' ):b' ' )[1 ])while len (keystring) > 4 :">I" , keystring[:4 ])[0 ]4 :4 + l])4 + l:]1 ]) 2 ])return construct([n, e])if bord(extern_key[0 ]) == 0x30 :return _import_keyDER(extern_key, passphrase)raise ValueError("RSA key format is not supported" )
说明:
alipay2.0+版本中增加了对extern_key.startswith(b'-----begin openssl key '):的判断,而问题就出在这里。
5.调用支付宝接口使用的流程 下面我结合我的项目中对接支付宝的例子进行说明:
1 2 3 4 5 6 7 8 9 10 11 12 13 14 15 16 17 18 19 20 21 22 23 24 25 26 27 28 29 30 31 32 33 34 35 36 37 38 39 40 41 42 43 44 45 46 47 48 49 50 51 52 53 54 55 56 57 58 59 60 61 62 63 64 65 66 67 68 69 70 71 72 73 74 75 76 77 78 79 80 81 82 83 84 85 86 87 88 89 90 91 92 93 94 95 96 97 98 99 100 101 102 103 104 105 106 107 108 109 'django' )'order_' )class PaymentOperation (APIView ):""" the operation of Ali payment """ open (settings.APP_KEY_PRIVATE_PATH).read()open (settings.ALIPAY_PUBLIC_KEY_PATH).read() @property def get_serializer_class (self ):return self.serializer_classdef get_serializer (self, *args, **kwargs ):return serializer_class(*args, **kwargs) @property def get_alipay (self ):"RSA2" ,return alipay @staticmethod def combine_str (alipay, order ):"""assemble the url of get""" str (order.total_price), return order_string @method_decorator(login_required(login_url='consumer/login/' ) ) def get (self, request ):""" 创建订单基本信息,address,order_id 核对总价钱 """ if order is None :return Response(response_code.create_order_error)"alipay_url" : settings.ALIPAY_GATE + order_string})return Response(response_code.create_order_success)def post (self, request ):"""this function used to accept the post returned by alipay""" 'sign' , None )if status:'out_trade_no' ))return Response('成功' )else :return Response('失败' )class UpdateOperation (APIView ):"""receive the GET from alipay,display to user on screen""" @property def get_out_trade_no (self ):return int (round (time.time() * 1000000 ))def update_order (self, order_id ):"""更新订单""" def get (self, request ):'out_trade_no' )'total_amount' )filter (orderId=out_trade_no).update(status="2" , trade_number=self.get_out_trade_no)return redirect('/order/personal_order/' )
说明:
① 首先创建alipay对象,获取前端传过来的基本数据,生成订单号(或者传过来订单号也行),创建订单基本表,以及订单详情表。
② 根据这些信息和使用的网关类型(沙箱or上线),拼接成新的url。
③ 将url返回给前端,前端进行重定向到相应的页面。
④ 用户进行付款,付款后,支付宝会回调两个请求,一个POST,一个GET只有项目正式上线,支付宝才会回调POST请求,不然只会回调GET请求(我用日志测试过,沙箱环境,接收不到POST请求)
⑤ 回调的POS或GET请求用于更新订单信息,最后返回给用户界面显示
如果还不是特别明白的话,我在网上找到了这张图,可以看下这张图
参考文档:
https://github.com/fzlee/alipay/blob/master/README.zh-hans.md#alipay.trade.page.pay
 {:width=50%}
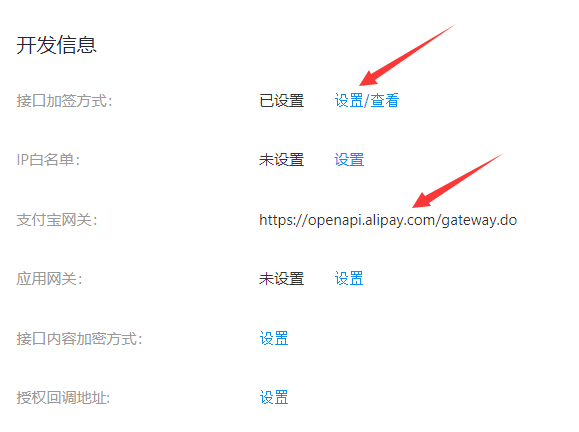 {:width=60%}
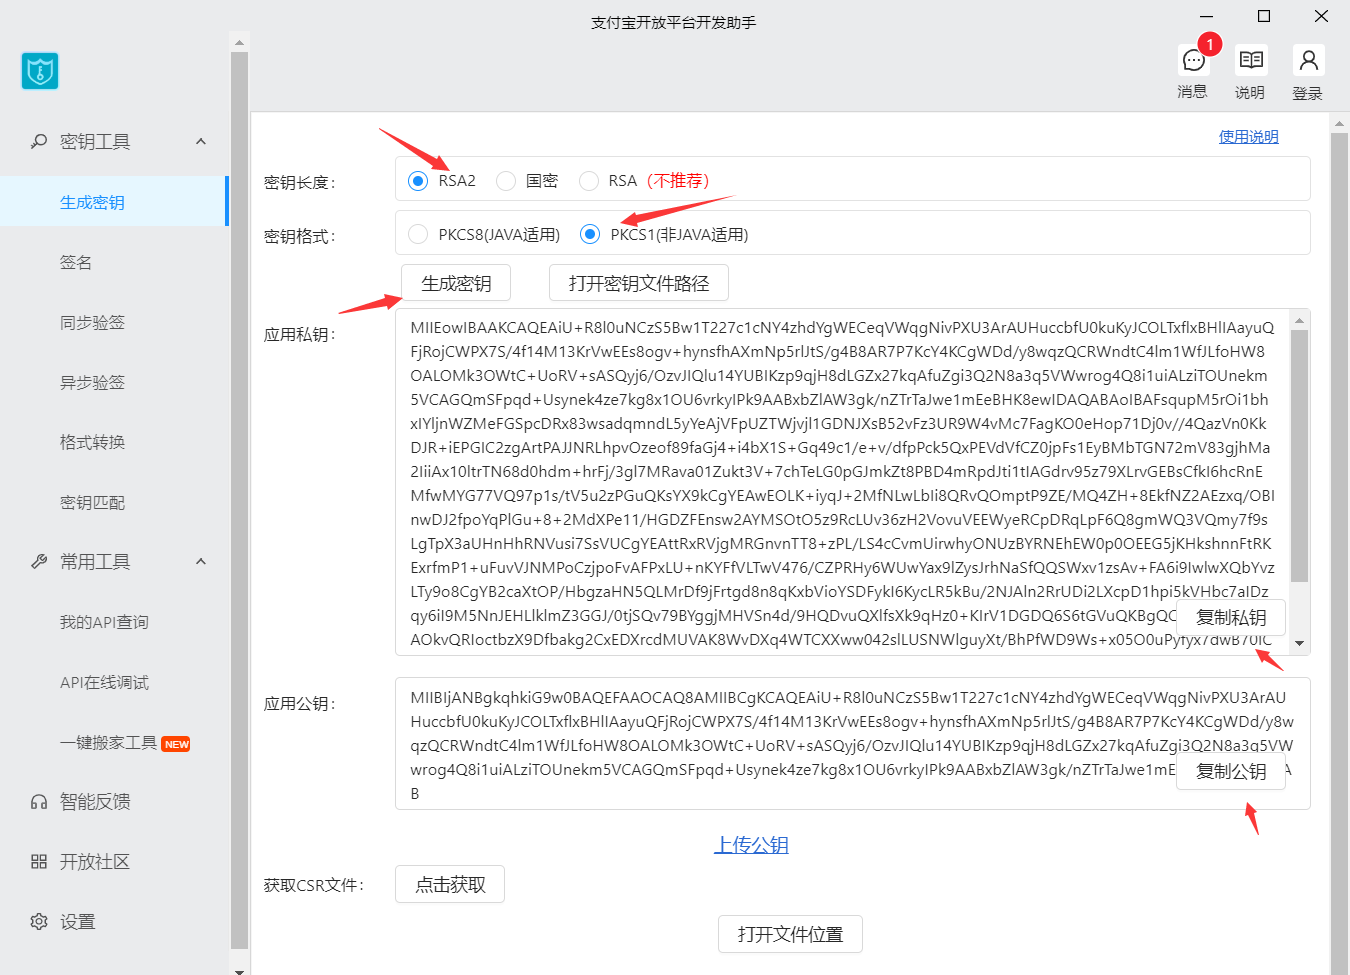 {:width=60%}
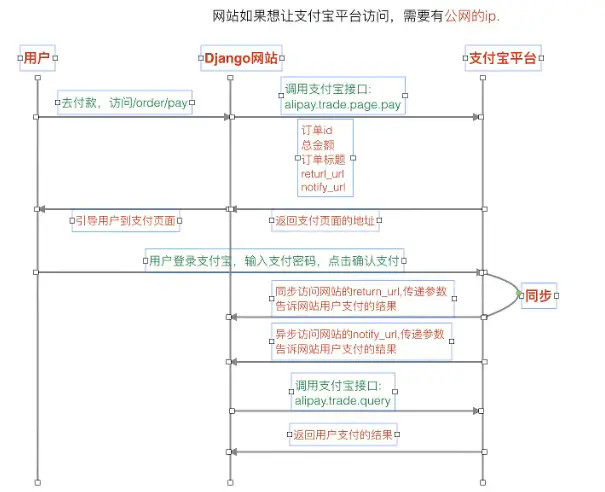 {:width=90%}